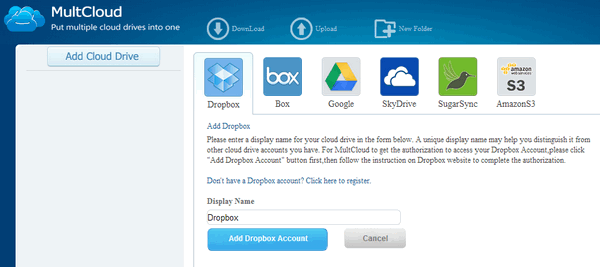
 Cloud storage services are now getting more and more popular as they have the ability to sync files across devices which are connected to the Internet. This way you can get hold of the files on any devices anywhere across the world. There are many free cloud storage services like Dropbox, Google Drive, Box.net, SkyDrive etc. Most of these offer few GB of online storage for free. Most of us have multiple accounts across these cloud storage and the biggest pain is probably accessing these storage spaces independently. If you use multiple cloud storage services and want to access all of them in a single interface, then MultCloud is your answer. MultCloud will help you do the centralized management with all your cloud drives. It supports almost all the popular cloud services including Dropbox, Google drive, Box.net, SkyDrive, Amazon Cloud Drive,SugarSync.
You need to create an account with the service to start using it. As you can see from the interface, you can add these services once you have verified your account. You can also add multiple accounts for the same service, supposing that you have registered two accounts in Dropbox,it can supervise all the files of both accounts simultaneously. It can copy a file form one cloud to another, the file transfer function among multiple cloud drives. For Example, through MuitCloud, you can directly copy or cut the files in Google Drive to SkyDrive, and this process will be accomplished online without the need of downloading to local PC. MultCloud will allow you to share files from cloud drives with others, even with a specific person easily and safely. MultCloud says that it uses 256-bit AES Encryption for SSL in data transfer and does not save the passwords of any of the service to connect with it.
The web app also has a viewer included, so all the common types of documents,like .doc, .pdf, .xls, etc, and also images can be viewed online. Overall, the service looks pretty good and it is completely free of cost. via LifeRocks |
Advertise Here

Thursday, November 28, 2013
Manage Dropbox, Google Drive, SkyDrive, Amazon Cloud Drive, Box.net at Single Location with MultCloud

Saturday, November 23, 2013
Restricting or denying FTP access in Microsoft ISA Server or Microsoft Forefront TMG
Option 1: Restricting or denying FTP access in Microsoft ISA Server or Microsoft Forefront TMG
To restrict FTP to specific users only, it is advisable to create two rules: one to allow usage of common protocols to all users except FTP, and another to allow FTP to particular users only, example the administrator.

Screenshot 14: Microsoft ISA Server: Configured Firewall policies
The preceding screenshot shows both rules.
Firewall Policy Rule 2 allows common protocol traffic from all users to pass from the internal network to the Internet. Note that the Protocols list does not include the FTP protocol.
Firewall Policy Rule 1 allows FTP protocol usage only by the Administrator. To set this rule to allow the administrator to access an FTP server:
On Microsoft ISA Server
1. On the Microsoft ISA Server machine, navigate to Start > Programs > Microsoft ISA Server > ISA Server Management.
2. From the left panel, expand Arrays > <machine name> > Firewall Policy.
3. Right-click Firewall Policy and select New >Access Rule.
4. Key in a name for this rule; for example 'Allow FTP' and click Next.
5. Select Allow and click Next.

Screenshot 15: Microsoft ISA Server: Protocols dialog
6. In the Protocols dialog, click Add.
7. In the Add Protocols dialog, expand All Protocols, select FTP, click Add and Close.
8. In the Protocols dialog click Next.
9. In the Access Rule Sources dialog, click Add.
10. In the Add Network Entities dialog, expand Computer Sets, select Anywhere, click Add and click Close.
11. In the Access Rule Sources dialog click Next.
12. In the Access Rule Destinations dialog, click Add.
13. In the Add Network Entities dialog, expand Computer Sets, select Anywhere, click Add and click Close.
14. In the Access Rule Destinations dialog click Next.
15. In the User Sets dialog, select All Users and click Remove.
16. Click Add.

Screenshot 16: Microsoft ISA Server: Add Users dialog
17. In the Add Users dialog, select Administrator, click Add and click Close.
18. Click Next and Finish.
19. Make sure to save settings before exiting.
On Microsoft Forefront TMG
1. On the Microsoft Forefront TMG machine, navigate to Start > Programs > Microsoft Forefront TMG > Forefront TMG Management.
2. From the left panel expand Forefront TMG <machine name>.
3. Right-click Firewall Policy and select New > Access Rule.
4. Key in a name for this rule; for example 'Allow FTP' and click Next.
5. Select Allow and click Next.

Screenshot 17: Microsoft Forefront TMG: Protocols dialog
6. In the Protocols dialog, click Add.
7. In the Add Protocols dialog, expand All Protocols, select FTP, click Add and click Close.
8. In the Protocols dialog click Next.

Screenshot 18: Microsoft Forefront TMG: Access Rule Sources dialog
9. In the Access Rule Sources dialog, click Add.
10. In the Add Network Entities dialog, expand Computer Sets, select Anywhere, click Add and click Close.
11. In the Access Rule Sources dialog click Next.
12. In the Access Rule Destinations dialog, click Add.
13. In the Add Network Entities dialog, expand Computer Sets, select Anywhere, click Add and click Close.
14. In the Access Rule Destinations dialog click Next.
15. In the User Sets dialog, select All Users and click Remove.
16. Click Add.
Screenshot 19: Microsoft ISA Server: Add Users dialog
17. In the Add Users dialog, select Administrator, click Add and click Close.
18. Click Next and Finish.
19. Save settings before exiting.
Wednesday, November 20, 2013
Hack and Crack IDM (Internet Download Manager ) - How to?
- Hello Friends, Using this hack you can register the Internet Download Manager (IDM) for free using you own credentials i.e register on your Name and email ID.
- I am explaining the manual hacking method because most of my users said that patch and keygen contain viruses. This hack also works for trail IDM that means download a trail IDM from there site and register the professional i.e. full version of IDM with your credentials for free using my hack.
Hack or crack IDM manually:
- Step 1: Download the IDM trial or If you already have IDM installed Update it by going to Help---}} then to check for Updates.
- Step2: Now Go to START => Then go to RUN and type the following text and click enter:
- notepad %windir%\system32\drivers\etc\hosts
- Step3: Now right click on hosts file and go to its properties, then go to security tab and then select your admin account, just below u will see an edit button (in front of change permissions), Now give the user full control and write and read rights and then click on apply and then click on Ok, now u will be able to edit the hosts file and save changes in it.
Detail Note about Granting Permission In Windows7:
- For Windows 7 users, due to security reasons you will not be able to save hosts file.so follow this steps : First of all go to C:/ drive then go to Windows Folder and then go to System32 folder and then go to Drivers folder and then go to Etc Folder, in the Etc folder you will see the hosts file.
- Now right click on hosts file and go to its properties then go to Security tab select Users under Group or user names and click on edit button,Permission For Host Window will get open, in that window select Users account and grant permission in bellow section which is "Permission for SYSTEM" by clicking all checkbox under "Allow" Name and press Ok.Dnt click on any Deny check box.
- Note: If you have login through admin then skip this step6 .Its just for granting permission for editing file.
- Step4: Now a notepad file appears something like this as shown below:
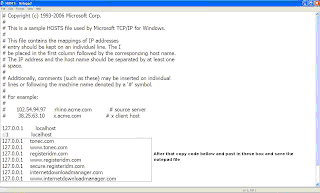
- Now copy the below lines of code and add to hosts file as shown above image box :
- 127.0.0.1 tonec.com
- 127.0.0.1 www.tonec.com
- 127.0.0.1 registeridm.com
- 127.0.0.1 www.registeridm.com
- 127.0.0.1 secure.registeridm.com
- 127.0.0.1 internetdownloadmanager.com
- 127.0.0.1 www.internetdownloadmanager.com
- 127.0.0.1 secure.internetdownloadmanager.com
- 127.0.0.1 mirror.internetdownloadmanager.com
- 127.0.0.1 mirror2.internetdownloadmanager.com
- After adding these piece of code, save the notepad file. And exit from there.
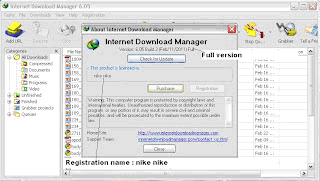
- Step5: Now open IDM and click on Registration. When you click on registration, Now a new dialog(window) appears that is asking for Name, Last Name, Email Address and Serial Key.
- Step6: Now Enter you name, last name, email address and in field of Serial Key enter any of the following Keys:
- RLDGN-OV9WU-5W589-6VZH1
- HUDWE-UO689-6D27B-YM28M
- UK3DV-E0MNW-MLQYX-GENA1
- 398ND-QNAGY-CMMZU-ZPI39
- GZLJY-X50S3-0S20D-NFRF9
- W3J5U-8U66N-D0B9M-54SLM
- EC0Q6-QN7UH-5S3JB-YZMEK
- UVQW0-X54FE-QW35Q-SNZF5
- FJJTJ-J0FLF-QCVBK-A287M
- And click on ok to register.
- Step7: After you click ok, it will show an message that you have registered IDM successfully.
- Now start your Internet download manager, and now you IDM has been converted to full version and specially when you update next time, your registration will not expire.
- That means it will remain full version for life time and you can update it without any problem in future.
Proof of Successfully Hacking IDM:
- Note: To update idm you have to remove those websites added in the host file, after removing those website,save that Hosts file and update IDM software. After succesfull updation again follow above steps to crack Internet Download manager.
- I hope you are now able to convert your Trial version of IDM into Full Version. If you have any problem in this tutorial on Hack and Crack IDM,
- please mention it in comments. Enjoy.....
Saturday, November 9, 2013
How to Add Your Gmail Account to Outlook 2013 Using IMAP

If you use Outlook to check and manage your email, you can easily use it to check your Gmail account as well. You can set up your Gmail account to allow you to synchronize email across multiple machines using email clients instead of a browser.
We will show you how to use IMAP in your Gmail account so you can synchronize your Gmail account across multiple machines, and then how to add your Gmail account to Outlook 2013.
To setup your Gmail account to use IMAP, sign in to your Gmail account and go to Mail.

Click the Settings button in the upper, right corner of the window and select Settings from the drop-down menu.

On the Settings screen, click Forwarding and POP/IMAP.

Scroll down to the IMAP Access section and select Enable IMAP.

Click Save Changes at the bottom of the screen.

Close your browser and open Outlook. To begin adding your Gmail account, click the File tab.

On the Account Information screen, click Add Account.

On the Add Account dialog box, you can choose the E-mail Account option which automatically sets up your Gmail account in Outlook. To do this, enter your name, email address, and the password for your Gmail account twice. Click Next.

The progress of the setup displays. The automatic process may or may not work.

If the automatic process fails, select Manual setup or additional server types, instead of E-mail Account, and click Next.

On the Choose Service screen, select POP or IMAP and click Next.

On the POP and IMAP Account Settings enter the User, Server, and Logon Information. For the Server Information, select IMAP from the Account Type drop-down list and enter the following for the incoming and outgoing server information:
- Incoming mail server: imap.googlemail.com
- Outgoing mail server (SMTP): smtp.googlemail.com
Make sure you enter your full email address for the User Name and select Remember password if you want Outlook to automatically log you in when checking email. Click More Settings.

On the Internet E-mail Settings dialog box, click the Outgoing Server tab. Select the My outgoing server (SMTP) requires authentication and make sure the Use same settings as my incoming mail server option is selected.

While still in the Internet E-mail Settings dialog box, click the Advanced tab. Enter the following information:
- Incoming server: 993
- Incoming server encrypted connection: SSL
- Outgoing server encrypted connection TLS
- Outgoing server: 587
NOTE: You need to select the type of encrypted connection for the outgoing server before entering 587 for the Outgoing server (SMTP) port number. If you enter the port number first, the port number will revert back to port 25 when you change the type of encrypted connection.
Click OK to accept your changes and close the Internet E-mail Settings dialog box.

Click Next.

Outlook tests the accounts settings by logging into the incoming mail server and sending a test email message. When the test is finished, click Close.

You should see a screen saying "You're all set!". Click Finish.

Your Gmail address displays in the account list on the left with any other email addresses you have added to Outlook. Click the Inbox to see what's in your Inbox in your Gmail account.

Because you're using IMAP in your Gmail account and you used IMAP to add the account to Outlook, the messages and folders in Outlook reflect what's in your Gmail account. Any changes you make to folders and any time you move email messages among folders in Outlook, the same changes are made in your Gmail account, as you will see when you log into your Gmail account in a browser. This works the other way as well. Any changes you make to the structure of your account (folders, etc.) in a browser will be reflected the next time you log into your Gmail account in Outlook.
[via howtogeek]
Monday, November 4, 2013
How To Prepare Windows 8.1 Bootable USB On Mac OS X
| How To Prepare Windows 8.1 Bootable USB On Mac OS X Posted: 04 Nov 2013 03:07 AM PST If your Windows installation is corrupted and you don't have a bootable USB or DVD to perform a clean install of Windows 8.1, you can use your Mac machine to create bootable Windows 8.1 USB drive without having to install third-party utilities. One can use the native Boot Camp Assistant software that ships with all […] |
Saturday, November 2, 2013
How to Break Into a Windows PC (and Prevent It from Happening to You)
Music by Multifaros.
There are a few methods to breaking into a computer, each with their own strengths and weaknesses. Here, we'll go through three of the best and most common methods, and nail down their shortcomings so you know which one to use—and how to exploit their weaknesses to keep your own computer secure.
The Lazy Method: Get at the Files with a Linux Live CD

If you don't need access to the OS itself, just a few files, you don't need to go through much trouble at all. You can grab any Linux live CD and just drag-and drop files onto a USB hard drive, as you would in any other OS.
How It Works: Just download the live .iso file for any Linux distribution (like the ever-popular Ubuntu) and burn it to CD. Stick it in the computer you want to access and boot up from that CD. Pick "Try Ubuntu" when it comes up with the first menu, and it should take you right into a desktop environment. From here, you can access most of the hard drive just by going to the Places menu in the menu bar and choosing the Windows drive. It should see any NTFS drives just fine.
Note that depending on the permissions of some files, you might need root access. If you're having trouble viewing or copying some files, open up a terminal window (by going to Applications > Accessories > Terminal) and type in sudo nautilus, leaving the password blank when prompted. You should now have access to everything.

How to Encrypt and Hide Your Entire Operating System from Prying Eyes
Over the years, we've written about loads of different ways to hide and encrypt your private data from others, but if you're really serious … Read…
How to Beat It: This method can give you access to the file system, but its main weakness is that the malicious user still can't access any encrypted files, even when using sudo. So, if the owner of the computer (or you) has encrypted their files (or encrypted the entire OS), you won't get very far.
Break Into Windows, Method One: Clear the Password with the Trinity Rescue Kit

If you need access to the operating system itself, the Linux-based Trinity Rescue CD is a good option for breaking in. You'll need to do a bit of command line work, but as long as you follow the instructions closely you should be fine.
Related
How to Boot From a CD or USB Drive on Any PC
Occasionally, if you're troubleshooting your PC or installing a new operating system, you'll have to "boot it from a disc" or USB … Read…
How It Works: Just download the ISO file from the Trinity Rescue web site and burn it to disc. Boot from the disc and wait for everything to load. When you get to the main menu, choose the "Windows Password Resetting" option, and go to "Interactive Winpass."
Next, just follow the onscreen instructions. Choose the partition you want to edit, select "Edit User Data and Passwords," type in the name of the user you want to edit, and choose option 1: "Clear (Blank) User Password" (option 2 did not work for me). When you're done, you can type an exclamation point (!) to quit that menu, then press q to quit the Winpass menu. Restart your computer and you should be able to enter Windows password-free.
How to Beat It: Once again, the weakness of this method is that it still can't beat encryption. Wiping the password will disallow you access to those encrypted files, which, if the user has encrypted their entire OS, makes this method pretty useless. If they've only encrypted a few files, though, you'll still be able to access all the unencrypted stuff without a problem. This method also doesn't work with Windows 8 PCs that use Microsoft accounts to log in, though it will work on local accounts.
Break Into Windows, Method Two: Crack the Password with Ophcrack

Where the other methods are vulnerable to encryption, this method will give you full access to everything the user can access, including encrypted files, since this method relies on finding out the user's password instead of bypassing it. It also works on Windows 8 computers even if the user in question authenticates with a Microsoft account.
How It Works: All you need to do is download and burn the Ophcrack Live CD (use the Vista version if you're cracking a Windows 7 or 8 PC) and boot from it on your computer. It'll take a little bit of time to boot, but eventually it will bring you to a desktop environment and start attempting to crack passwords (if it doesn't, try choosing "Text Mode" from the original menu). This may take a while. You'll see the passwords pop up in the top pane of the window, though, when it finds them (or, if it doesn't find them, it'll notify you). You can then reboot and log in to Windows using those passwords.
How to Beat It: Ophcrack uses Rainbow Tables to crack the password directly. So, while this method works on encrypted OSes, it can't crack every password out there. To increase your chance of having an uncrackable password, use something complicated and greater than 14 characters. The stronger your password, the less likely Ophcrack will be able to figure it out.
Get Thousands of Visitors for Your Website

Get Free Dot Tk Domain

Earn Money by Just Shortening URL
