Advertise Here

Support our Sponsors

Thursday, August 8, 2013

How to Increase Your Windows Laptop’s Battery Life

How to Increase Your Windows Laptop's Battery Life

laptop-activity-leds

We often fixate on smartphone battery life, but most laptops still don't have all-day battery life. Rather than always using your laptop tethered to an outlet, here are some ways to squeeze more life from your laptop's battery.

None of these tricks will turn a laptop without much stamina into an all-day workhorse, but they'll help you go without an outlet for longer. Pay particular attention to your laptop's display — that's the big battery sucker.

Reduce Screen Brightness

The biggest battery drain on any modern portable electronic device — whether it's a laptop, smartphone, or tablet — is the display. Reducing your screen's brightness is a simple way to squeeze significantly more time from your laptop's battery.

On a typical laptop, you generally hold the Function (Fn) key and press the brightness buttons on your laptop keyboard. The lower the brightness level, the longer you can use your laptop on battery power.

You can also use the Windows Mobility Center to quickly adjust screen brightness. Open it by pressing Windows Key + X on Windows 7. On Windows 8, you can launch it from the Control Panel — Windows Key + X opens the power user menu instead.

Have Your Display Automatically Turn Off

If you step away from your laptop for a few minutes, its screen will still be on, draining power. You can set more aggressive display power settings to have the laptop dim and turn off the display when you're not using it.

Open the Power Options dialog in the Control Panel and set your display to dim and turn off after a short period of time. You can move your mouse or press any key to turn the display right back on with no delay, so this is an easy way to save power — as long as the display doesn't turn off while you're using the laptop, this shouldn't bother you too much. Media players set the display to automatically stay on while they're running, ensuring you can still watch a video without constantly having to move your mouse or changing your power settings.

Disable Bluetooth and Other Hardware Devices

Your laptop likely has a Bluetooth radio and may even have an infrared (IR) port. All of these devices use battery power simply by being enabled and powered on. You can save battery power by disabling them when you aren't using them. To disable Bluetooth, you can often press the Function (Fn) key and press the key with the Bluetooth symbol on your laptop.

Disabling Wi-Fi can also help if you aren't using it. For example, if you're using your laptop on an airplane and not taking advantage of in-flight Wi-Fi, turn off your laptop's Wi-Fi to save some power. Wi-Fi can be turned off in a similar way using the function keys on your laptop or even by disabling the Wi-Fi adapter in the Control Panel's network connections window.

Tweak Your Power Plan

Windows offers power plans that can quickly change your laptop's power settings to different profiles. For example, you can have your computer in Balanced mode most of the time and switch to Power saver mode when you need every bit of power you can get. Each power plan's settings can be modified individually. You'll find power plans in the Control Panel's Power Options window.

To modify advanced power options, click the Change plan settings link and select Change advanced power settings.

You can change a variety of settings here, including setting your laptop to power off its hard drive more quickly and telling your computer to slow down the processor rather than turning on the fan if it becomes hot. Both of these behaviors will save power. The default settings should be fairly optimal if you select Power saver mode, but you can make the settings even more aggressive in some areas.

Use the Windows Power Troubleshooter

Windows 7 and 8 include a power troubleshooting tool that will scan your system for common battery drains automatically fix them. To load this tool, open the Troubleshooting pane in the Control Panel — perform a search for Troubleshooting to find it.

Select the View All option in the Troubleshooting pane and launch the Power troubleshooter.

Windows will look for common issues and automatically fix them. This is a quick way to check if a laptop's settings are optimal without digging through many different options dialogs.

Slim Down Startup Programs, Use Lighter Software

To save power, make your computer do less in general:

  • Don't use a screensaver. They're unnecessary on modern displays and will drain your battery to do nothing useful when your display could be off and saving power.
  • Run less programs in the background. Examine your system tray for programs you don't need and uninstall them or disable them and prevent them from automatically starting with your computer.
  • Reduce CPU usage. If you use heavy programs that have your CPU doing a lot of work all of the time, your CPU will use more power and your battery will drain faster. Running less programs in the background can help with this, as can selecting lightweight programs that are easy on system resources.
  • Avoid maxing out your RAM. If your computer fills its RAM and needs more memory, it will move data to the page file on its hard drive and this hard drive usage can drain battery. This shouldn't be a problem on modern computers with a decent amount of RAM. If your laptop's RAM is full, try to make more RAM available — close programs running in the backgrounds or even upgrade your laptop's RAM.

The less your computer has to do, the more power it can save. You can find more information about CPU and RAM usage in your Task Manager.

Hibernate Instead of Sleep

When your laptop goes to sleep, it uses a small amount of power to power its RAM and keep its system state loaded in memory, allowing it to wake up and resume in just a few seconds. When your laptop hibernates, it saves its system state to disk and powers off, using almost no power.

If you're not going to be using your laptop for a few hours, place it into hibernate mode rather than sleep mode to conserve even more battery power. Sleep mode doesn't use a lot of battery power, but hibernate uses as much as having the computer powered off.


If you've had your laptop for a while and the battery is holding less power than it used to — but you're not ready to upgrade to a new laptop just yet — you can try replacing your laptop's battery with a new one for even longer battery life.

[via howtogeek]

Thursday, August 1, 2013

Scan to PDF using your smartphone.

PCWorld
header

The Power to eliminate clutter far beyond any ScanSnap before it!
The iX500 is the next generation of desktop scanner. Its dual-core, CPU-mounted "GI" processor enables it to perform intelligent image functions dramatically faster. And with a Wi-Fi connection, you can now scan directly to an iOS or Android mobile device without even turning on your computer. Watch video

See everything the ScanSnap iX500 has to offer, visit http://us.fujitsu.com/scansnap/

Regards

Nafees khan

www.techshare.tk

Tuesday, July 9, 2013

How to Enable Pin Sign-in For Domain Users on Windows 8

Domain users are not allowed to sign in with a Pin by default. However, using a little bit of GPO, we can change that.

How to Enable Pin Sign On For Domain Users on Windows 8

Press the Win + R keyboard combination to open a run box then type "gpedit.msc" and press enter.

When the Group Policy editor opens, navigate to:

Computer Configuration\Administrative Templates\System\Logon

On the right hand side, double click on the "Turn on PIN sign-in" setting.

Now switch the radio button from Not Configured to Enabled, then click Apply.

Once the setting has been activated, you need to refresh your current Group Policy settings. To do that, open a run box using the Win + R keyboard combo and type the following, then press enter.

gpupdate /force

Of course, this will only be useful in a domain environment, in which case you could assign this group policy setting to an OU in Active Directory. That's all there is to it.

Wednesday, June 12, 2013

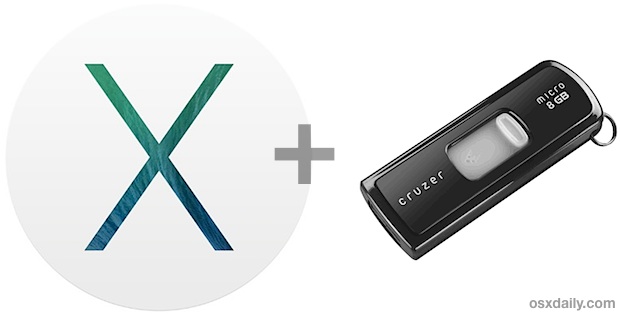
How to Make a Bootable OS X Mavericks (10.9) USB Install Drive

Just like other recent major Mac updates, OS X Mavericks arrives as an app that wants to update the current OS X installation, and with a little work you can make a bootable USB installation drive. This allows you to easily perform partitioning for dual boot situations, clean installs, upgrades on multiple Macs, and more, plus it's just really convenient to have for troubleshooting and simple future installations, without having to re-download OS X 10.9 every time you want to install it or perform an upgrade.

OS X Mavericks boot install drive

But unlike before with creating prior version OS X boot install drives, the process is slightly different with Mavericks and requires an additional set of steps to make the installer actually function as a a bootable installer disk. It's not too complicated, just a bit more time consuming.

Before beginning, make sure the Mac you want to install Mavericks on meets the system requirements for 10.9. You will need OS X Mavericks (obviously), and an 8GB (or larger) USB drive that you don't mind formatting, we're using a USB thumb drive for the purpose of this walkthrough but an external hard drive should work as well.

Create a Bootable OS X 10.9 Mavericks Installer

  • Download OS X Mavericks (get Developer Preview from Apple, devs only for now) but do not install it yet
  • Attach the USB drive to the Mac and launch Disk Utility
  • Choose the USB drive from the left side menu, click the "Partition" tab, select "1 Partition" from the drop down menu, and then click the "Options" button to select "GUID" as the partition type, click "OK" then click "Apply"
  • Launch Terminal to show hidden files and relaunch the Finder using this defaults command string:
  • defaults write com.apple.Finder AppleShowAllFiles TRUE;\killall Finder;\say Files Revealed

  • Go to the /Applications/ folder to locate the "Install OS X 10.9 Developer Preview.app" file
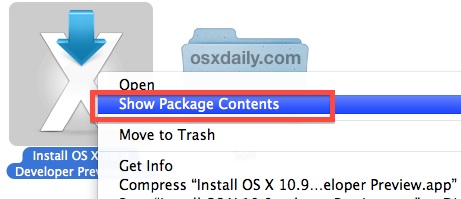
  • Right-click and choose "Show Package Contents", then open "Contents" and open "SharedSupport"
  • Show Package Contents of Mavericks installer

  • Double-click to mount "InstallESD.dmg"
  • Open the mounted 'OS X Install ESD' image, and right-click "BaseSystem.dmg" choosing "Open" to mount the image (BaseSystem.dmg is invisible by default, thus why invisible files must be made visible in the earlier step)
  • OS X Mavericks basesystem.dmg visible

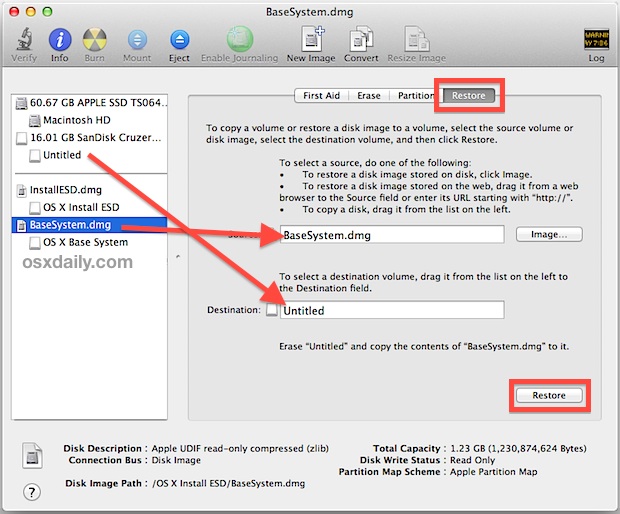
  • Go back to Disk Utility, then select "BaseSystem.dmg" from the sidebar and then click the "Restore" tab
  • With "Source" set to "BaseSystem.dmg", set "Destination" to the USB drive by dragging the USB drive into the box, then click "Restore" to begin – confirm that contents of the drive will be erased
  • Create the OS X Mavericks Boot Installer drive

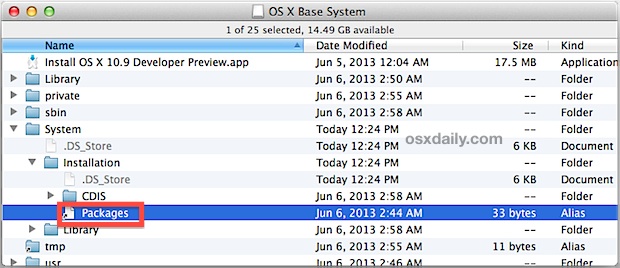
  • When finished, go to Finder and navigate within the newly created USB drive to System > Installation > and delete the file (alias) located here named "Packages" – keep this window open
  • Delete OS X Mavericks Packages link

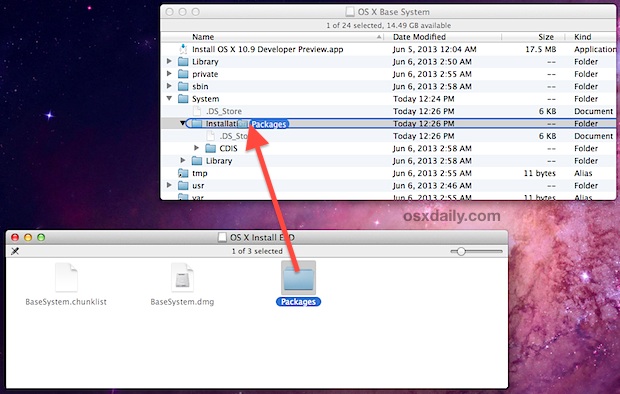
  • Go back to the 'OS X Install ESD' mounted drive, and drag & drop the "Packages" folder into the /System/Installation/ directory you just deleted the Packages alias from, let this large folder copy

OS X Mavericks finishing the Boot Install drive by copying Packages folder

Once that Packages folder is finished copying to the drive, the USB drive is now ready to be booted from which it can install OS X Mavericks from.

Booting from OS X Mavericks Install Drive

  • With the USB drive attached, reboot the Mac and hold down the Option key
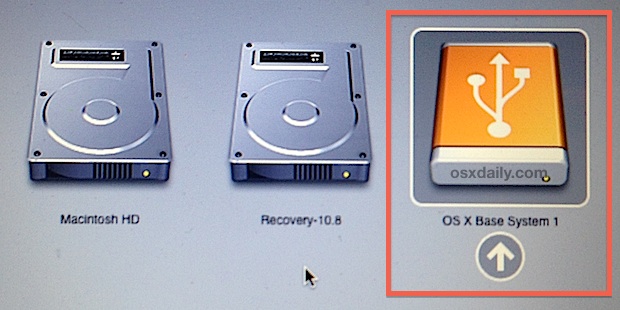
  • Select the orange drive, labeled "OS X Base System 1″ from the boot menu
  • Proceed with the installation as usual

OS X Mavericks bootable install drive

Tuesday, June 4, 2013

HOW TO CHANGE THE DISPLAYED NAME OF THE PROCESSOR IN WINDOWS 7, XP, AND VISTA

Friends today we will learn how to change the processor name, this trick works in windows 7/vista and xp.


Just follow below simple steps.
Step One: Open up the Registry editor (RegEdit).
First, click Start, and search RegEdit (Windows 7/Vista). Open up regedit when the search has found it.

Step Two: On the left hand column in Registry Editor, open HKEY_LOCAL_MACHINE, under it,
open up: Hardware->DESCRIPTION->System->CentralProcess
or->1

Step Three: Now you can see a few lines of text on your right side in Registry Editor. Double-Click the one that is named "ProcessorNameString". A small box will pop-up, and you can change the processor's name to anything you like. After your done, press enter and close Registry Editor.

Step Four: Now we will see what we have changed under Windows.
Open Start, and Right-Click Computer, then click Properties in the Context Menu

Step Five: You can see your processor name changed to what ever you changed it to .

Troubleshooting: If the processor name did not change, Do step one, but on Step Two, instead of going into the number 1, go into number 0, and follow the rest of the Tutorial

keep visiting :)
via geekofreak

Friday, May 31, 2013

THE TECHNO GEEK: 10 Best Android Secret Tips and Tricks

THE TECHNO GEEK: 10 Best Android Secret Tips and Tricks: 10 Best Android Secret Tips and Tricks    Android is the Linux based operating system designed primarily for touch screen mobile phon...

Friday, May 10, 2013

First Impressions: Samsung Galaxy S IV

When the Samsung Galaxy Galaxy S IV was launched at Radio City in New York midst a lot of razzmatazz, in spite of a lot of face palm moments everybody knew that, Galaxy S IV would be the iridium standard that every smart phone that launches in 2013 would be compared against. The phone was launched just over a week ago in India and we got a unit for ourselves a couple of days.

Samsung galaxy S IV front view

Although not in a position to put forth a full review, we would like to share our experience so far of using the most anticipated device of the year. Is the device a true successor to the vastly popular and successful Samsung Galaxy S III or will the HTC One with all it's Aluminum glorious chassis trump the plastic clad powerhouse that the Samsung Galaxy S IV is to take the glory? Let's dig in.

Is the Samsung Galaxy S IV Worth all the Money You Saved up for it?

Every time a Rs. 40,000+ gadget is launched in the market, you are bound to save up to pick it unless you are of the sorts who never checks the balance figures on his Bank Account statement. The Samsung Galaxy S IV falls into a similar category of devices. Is it a device worth saving for?

Samsung Galaxy S IV_lockscreen

Let's put it this way, when I saved up my student's income for a couple of months to buy an iPhone 5, I wanted to hold, touch and feel the device all day. I did not have that sort of feeling with the Galaxy S IV. It does not have the premium feel that you get from a device when you have spent a lot of money on. Yes, we are rambling over the plastic usage and a design that is not radically different from the Galaxy S III.

Samsung Galaxy S IV_top grille

Don't get me wrong. It is still a great smart phone, one that is extremely powerful and does just about everything that you throw at it with exceptional quality but first look at it and you will perhaps be hard pressed to save a lot of money to pick it. The phone has just about every great feature you could ask for, a great screen, a fantastic OS and a very sleek overall experience, but despite all these things going for it, it is not the smartest thing to spend your money. In fact, the manufacturing cost of the iPhone 5 is lower than that of the Galaxy S IV, yet the Apple flagship serves up quality several grades above than what Samsung does.

Samsung Galaxy S IV_top view

Top view of the Samsung Galaxy S IV compared with the HTC One X

Samsung Galaxy S IV_comparison

The HTC One X stacked upon Samsung Galaxy S IV to compare thickness

As Steve Litchfield pointed out in his Phone Show episode 199 here that picking a second hand mint conditioned Galaxy S III for about one third the price of the Galaxy S IV represents a lot more value for money than an out of box brand new S IV. The primary reason behind this is that although the S IV triumphs the S III on a specs front, all these improvements are not for everybody. You can actually read our rant about the Samsung Galaxy S IV here and the lack of groundbreaking changes over the S III. The S IV has a lot of features that perhaps an average user would never use or need. Simple example of this is, in the time I had the device, never did I feel the need of Air view or even Smart Scroll or Smart Pause. This maybe different for every individual, but I would definitely not be saving money to pick a Galaxy S IV especially when a certain HTC One is doing rounds.

She asked if I bought Home a Plastic Toy?

One of the best way I judge the hardware of any device is by showing it to people who literally know nothing about technology. This way, they can give an unbiased view of just the looks and feel of the device without knowing the awesome features that might be packed in. My heart sank a little when my mother, a little off tangent when it comes to technology, asked if the white shiny Galaxy S IV was a plastic phone or a dummy when she picked it during a routine cleaning of my work desk.

Samsung Galaxy S IV_ side view

The metal like strip around the device is indeed plastic

The Galaxy S IV, though a really slim device with well rounded corners, just failed to turn the heads around the way you expect from a premium gadget. Even in a crowded mall the device failed to generate the sort of curiosity or crowd that normally a newly released high end product would. The back is textured unlike the plain plastic ones on the S III and provided a decent grip. If design matters to you, which definitely does to me, you will not be very impressed once you lay hands on the Galaxy S IV.

Samsung Galaxy S IV_ back

When I picked the device for the first time, I mistook the band around the device to be metallic but as it turned out, it in fact is plastic and did scratch a little when accidentally the phone slipped down. We ended up with a lamination just to make sure device stays brand new for a resale. The back panel although removable, to access the battery just does not give the solid indestructible feeling that you get holding devices like the Lumia 920 or the iPhone 5 which do not have removable panels. But again, this is down to personal preference as having access to the battery means you can easily carry a spare and never run out of juice.

The 1080 P Screen is Fantastic

You can hold build quality against Samsung, but one thing they have pioneered over the past couple of years is the screen of their devices. The Galaxy S IV is only the third device available in India after the HTC Butterfly and Xperia Z to sport a true HD 1080 P display. Bear in mind that the HTC One is not out yet.

Samsung Galaxy S IV_ app drawer

The 5 inch Super AMOLED display is terrific for watching videos and browsing the web. Although not ideal for one hand usage, there is no denying the general vibrancy of the color production on screen.

Samsung Galaxy S IV_ Screen

The color reproduction we felt was more life like on the HTC Butterfly as compared to the S IV but if you like deep bright colors then you will definitely fall in love with the display of the device. The outdoor visibility in our limited time outside was pretty good, and amazingly, the screen is not very reflective meaning a good clear view even in direct lights.

Too Many Features? Here To Remember?

There is loading, and then there is overloading. Like I touched upon earlier, the Galaxy S IV is loaded with way too many features. Most of these features although do have their utility are not something you will miss if they did not exist. That is why, there is a difference between loading the device with essentials and simply adding things for the sake of making a statement which seems like what Samsung have done. I would much rather have a Gig of more space on the internal memory of the device than have features like smart scroll that are a luxury.

Samsung Galaxy S IV_ features

These features too at the moment do not seem very polished. They do work, but there is an odd blips here and there. To be very honest, some of the add on to the Camera such as dual shot seemed pointless even to a relatively power user like me. Their application in day to day life is very limited and very honestly while taking shots in a hurry so that the moment does not slip away, I very nearly always forgot that some of these features even exist. Same goes for the likes of smart pause for instance. The best example of this was when I was watching one of the daily tech videos I do on Youtube, and since things were pretty boring, the football match had more of my attention. The S IV though kept on pausing the video every time I looked away or at least 80% of the time when the feature worked which I did not want. As a result I ended up turning the feature off.

Samsung Galaxy S IV_ internal memory

The internal memory takes a big beating due to large amount of bloatware

Smart Scroll, on the other hand, works only on the default Web Browser and since I like all my things in one place and restoring my sessions on the device I am using, I use Chrome which did not support the feature. Again, pretty much a waste. The bottom line here is, although there are a lot of good features on board, not many of them are very practical or things you would absolutely sure shot use everyday.

Samsung Galaxy S IV_voice control

Voice control is one of the many features present that you may not use everyday

S-Health on the other hand is an application with tremendous potential. It tracks down your workouts in a way similar to Nike's Fuel Band and you can quickly check the temperature and humidity levels which was interesting. The IR control for TV's was shoddy to say the least, but I would not make comments on it because perhaps the support for Indian DTH services may not be fully optimized yet. Another thing, which has a lot of potential though.

The On Board Performance is Fly

The Samsung Galaxy S IV available to us in India boasts the Exynos 5 Octa Core processor which is the assembly of two quad core chips though only one of them is functional at a time. Although the A15 Cortex Quad Core Processor is the one responsible for heavy tasks while the A7 1.2 GHz Quad Core chip does the regular things to conserve the battery and keep the performance smooth, I felt the device did start heating up pretty quickly with a couple of memory intensive tasks.

Samsung Galaxy S IV_ screen menu

The 2 GB RAM on board is more than sufficient and multi tasking was a piece of cake. Surprisingly, there were no lags in Touchwiz UI either while performing simple tasks like scrolling across the home screens, something that S IV's predecessor, the S III was not very capable at.

Samsung Galaxy S IV_ battery

The battery in our limited period of usage was pretty decent, without ever dropping our jaws and still felt that the Note II did a better job in this department. However, maybe a couple of updates from Samsung could easily address this issue. Since barely 11 GB of space is available on a 16 GB variant, I inevitably ended up adding a 16 GB card to load all the media files to the device. However, the reading was instant and no lags of any sort was experienced in my time of playing those Audio and HD Video files from the external storage.

Samsung Galaxy S IV_ about device

The device comes right out of the box with the latest Android jellybean version 4.2.2 so that makes the things all that more smoother and you get the latest goodness such as dash on the lockscreen and other features which are unique to Android 4.2. This was one of the best things without a doubt about the S IV.

The Camera takes a Mean Shot but you need to Tweak things a bit

The rear Camera on the Samsung Galaxy S IV is 13 Mega Pixel and does a fine job of taking pictures. The UI is similar to the Galaxy Camera if you have used and the simple scrolling interface made taking shots pretty simple. During the day light conditions, the phone matched the performance of our iPhone 5, but night shots were nothing to brag about. The pictures seem a little noisy and disturbances kept creeping in. Although I have not really been able to put the device on test with a Lumia 920 or even an HTC One for the performances in low light, we will keep our judgement reserved for the final review.

Samsung Galaxy S IV_ camera interface

Overall though, in our limited experience of using the Camera on the Samsung Galaxy S IV, it did what it is meant to and that is take decent shots for Social Media sharing, that is about all you can ask for a camera on your smart phone unless you own a Nokia 808 Pureview.

To Sum up my Experiences so far

By no means this is our final review of the Galaxy S IV since we feel we require more time with the device to know it inside out well. But, our initial impressions are good. The device is snappy, quick and works well and has a lot of useful add-ons to the Samsung Galaxy S III such as S-health. However, on the flip side, the plastic build quality and flimsy back panel, which does not give a very premium feel, coupled with some unnecessary features, which nobody would use after owning the device for about three months, means Samsung could for the very first time feel a real sweet chin music from the competitors.

Samsung Galaxy S IV_ dual shot

Dual shot is one of the many gimmicky add-ons

Although not available in the Indian markets yet, the HTC One is most certain to attract a lot of attention and the next iPhone will definitely be a popular choice just because it would be an iPhone. Maybe, the Galaxy S IV will not have the sort of easy walk to the top it had with the Galaxy S III. Only time will tell us how this story pans. We will be coming up with our final review as well as hands on video and camera samples soon, so stay tuned for that.

via Tech Splurge

Get Thousands of Visitors for Your Website

autosurf

Get Free Dot Tk Domain

Earn Money by Just Shortening URL