Advertise Here

Support our Sponsors

Sunday, February 24, 2013

Download ESET Rogue Applications Remover

ESET has released command line tool to get rid of rogue malware applications, the tool ESET Rogue Applications Remover is free of charge. Rogue applications are those which mislead you to pay money by showing false information regarding security or performance status of your computer.

You can use ERA Remover when your system was infected with rogue application or it has made unwanted changes to registry.

How to Run ESET Rogue Applications Remover?

1. You need to have admin rights to run this tool. Download 32-bit or 64-bit version of tool and double click on ERARemover to run from your computer.

2. Command prompt window will open and this tool first checks for active internet connection and there are after performs preliminary and main scan for rogue applications on your computer.

3. If it finds any rogue applications asks your for your permission to remove them and if it detects nothing you'll be prompted to visit ESET website to view the security products they offer.

ESET Rogue Applications Remover performing scan in command window thumb Download ESET Rogue Applications Remover

4. You can press "N" button to it avoid visiting ESET site and further press any key to exit from the command prompt window and the tool.

Rogue Applications Remover tool by ESET works on Windows XP/Vista/7/8.

Remove Toolbars from Browsers with Avast Browser Cleanup

A lot of software, when you install them, come with toolbars and although they show up in the installation process, many of us do not ignore them. As a result of this, a lot of toolbars might be installed on your browsers making it slow. Furthur, many of these toolbars are causes of malwares and other browser based infections on your PC. It is always advisable to pay attention when you install general software or borwser based add-ons.

In case you feel you browser is slowing down, then you should be checking out toolbars and add-ons installed. Avast Browser Cleanup is a freeware and portable tool to check and remove any toolbars and add-ons from your browser.

Browser Cleanup

When you run the tool, it detects all the installed browsers and lists all the add-ons and toolbars installed on your browser. You can hit the Remove all Add-ons list button and it cleans up.

You can also select ta particular browser from the tab and selectively remove the add-ons. The app also has option to skip checking for add-ons with good ratings. The app comes bundled with Avast, but in case you have not installed Avast, you can try the standalone version. It works on Windows XP SP2/Vista/Windows 7  and Windows 8 (both 32- bit& 64-bit).

Avast Browser Cleanup [via Techdows]

Thursday, February 21, 2013

Using the Ultimate Backup Tool to Create a Backup of Your Android Phone

android_backup_top

Backing up our PCs is something we are all used to. It's not something many people relish, but once an automated task has been set up, it is something that can be forgotten about until your suffer from hard drive failure or another disaster and need to think about restoring files. But things are not quite so easy when it comes to Android.

In theory things should be simple. This is an operating system from Google – a company not exactly unfamiliar with the notion of storing data in the cloud – so you would be forgiven for thinking that everything on your phone or tablet would be automatically, or at least easily, backed up for you. The reality is rather different.

Android Data Syncing

Many apps will store your data in the cloud. This includes, unsurprisingly, apps from Google. This means that your emails, contacts and other Google content don't really need backing up as such because it is all stored online anyway.

But this is only a very small portion of what you have stored on your Android device. To make it easier to upgrade to a new device, or to reset one that is being troublesome, details of all of the apps you have downloaded are stored in your account.

While this is useful, it is far from being the end of the story. Having Google remember which apps you have installed is all well and good, but what most people are more concerned about is the data that is stored within these apps.

Whether or not a particular app backs up data for you is a very hit and miss affair. There is no reason for any app not to offer this function, but it is often the case that data is not only stored locally, but that you are given no choice about where on your device it is stored. Major culprits here are games. You could spend weeks working through dozens of levels of your favorite game, but if you wipe your device for any reasons, you are going to have to start from scratch.

In some instances the data you create can be stored on an SD card – such as photos you take or office documents you create – but this is not always the case, and it is certainly not true of data you are not directly responsible for creating (such as game saves).

Backup Options

Depending on the device you have and the phone provider you use, you may well find that you have been provided with some form of backup tool, but these are usually a little limited. We have looked at how SnapPea can be used to control and backup your device but you may think that you need to root if you want to get serious about backing up.

If you go down this road you have a number of tools available including the superb Titanium Backup. But rooting is not something that everyone is comfortable with, so it's good to know that all is not lost if you would rather shy away from this option.

The Ultimate Backup Tool

We have looked at rootless backing up via the command line, but The Ultimate Backup Tool has a friendlier way of tackling the same task – there's no need to type out lengthy commands to backup.

Head to the XDA Developers forum to download a copy of the latest version of the tool.

You will need to extract the contents of the zip file you have downloaded as well as ensuring that your Android device has USB Debugging enabled – this can be found in the Developer Options section of settings.

Connect your phone or tablet to your computer and execute the UBT.bat batch file. In a matter of seconds your device should be detected – if it is not, it probably means that USB Debugging has not been enabled.

The simple text-driven menu is easy to understand. By default, backups will be saved to a 'backup' folder on your C: drive, but this can be changed by selecting option 1. But it is option 2 that takes care of the business of backing up – regardless of whether you are rooted or not.  Restoring data is equally easy and there's no need to fiddle around with configuration files – everything is backed up for you.

via howtogeek

Monday, February 18, 2013

Whatsapp vs Hike


Whatsapp vs Hike

Posted: 16 Feb 2013 11:27 PM PST

Ever since the short messaging service SMS is replaced by the messenger apps many new applications are coming out of the market every now and then.But I say that whatsapp become the  most popular among them and dished out all the competitors in all major countries.By numbers whatsapp is number one downloaded application in both play store and app store.


What makes Whatsapp More popular:

Everyday 10 billion messages were processed by Whatsapp which is definitely a threat to the major mobile carriers as they tend to communicate via the internet rather than the SMS which makes the carrier profitable.When more number of friends use this messenger then I am not going to use the SMS. This makes the application more popular everyday among the users who switch from SMS.


whatsapp vs hike

whats

What is Hike messenger app:

Hike is a new messenger app developed by Bharti softbank which is a partnership between bharti airtel of India and Softbank of japan.

Using Hike you can send messages to other hike user connected via internet,send pictures,videos and group chatting behike app for android hike android app reviewtween friends just like other messenger apps.Hike is similar to whatsapp with one remarkable feature is that you can send messages to the non hike users using the standard SMS but currently this feature is limited to 100 sms and only available in India.

Hike also provides the read/sent/typing notifications for the each message.It is now available for iOS,Android,Windows and symbian.To promote this application to more number of users the company have decided to provide the sms credit for every other user invited by you.

hike app review

One major threat in the country like india is the internet user base is very large and growth rate is increasing everyday.Carriers companies are developing such an application because in future people will only use messenger apps .

Download Hike 


via G2Networkblogs

Monday, February 4, 2013

Computer Freaks: 12 Top Tricks To Make Windows 8 Fun

Computer Freaks: 12 Top Tricks To Make Windows 8 Fun: Hello friends, today we are gonna discuss about  top tricks to make you windows 8 fun, manny of you would have updated to windows...

Tuesday, January 29, 2013

How to run Windows XP on Windows 7 or 8?

Users running into compatibility issues with Windows XP legacy applications running on later versions like Windows 7/8, will truly feel the essence of longstanding saying 'Old is Gold' or the term 'backward compatibility'. In this post, I will be sharing with you guys how to run Windows XP in Windows 7 or 8.

Microsoft did provide an alternative to end users for running Windows XP in Windows 7 known as 'XP mode', but have taken out this feature from their most recent release in the operating systems product line, Windows 8.

But as they say, 'When there is a will, there is a way'. Using XP mode on Windows 8 is also possible with a little tweaking. I will show you later in the post how to do that.

On Windows 7

For using Windows XP mode, the PC must meet certain system requirements. If it doesn't, XP mode would not work correctly even though downloading and installation process gets completed successfully.

PRE-REQUISITES

a) Is your computer Hardware Assisted Virtualization capable?
This tool can be downloaded from here. It can check whether your system is capable to run XP mode or not.

b) Is Hardware Assisted Virtualization enabled (if your computer supports)?
If your computer supports HAV, you may need to turn it on from BIOS. Check BIOS settings to confirm if this feature is enabled or disabled. To make XP mode work, HAV has to be enabled.

c) Your Windows 7 version must be Professional, Enterprise or Ultimate
Versions other than Windows 7 Professional, Enterprise or Ultimate are not supported.

HOW TO INSTALL AND USE WINDOWS XP MODE

  • XP MODE
  1. Download and install XP mode from here and choose Get Windows XP Mode and Windows Virtual PC now.
  2. Select your desired language and specify your current edition of Windows 7 that is being run.
  3. Under Download and install Windows XP Mode, click Download.
  4. Once downloaded, run the downloaded file.
  5. In the Welcome to Setup for Windows XP Mode dialog box, click Next.
  6. Choose the location for the virtual hard disk file that Windows XP Mode uses, or accept the default location, and then click Next.
  7. On the Setup Completed screen, click Finish.
  • WINDOWS VIRTUAL PC
  1. Go to the Windows XP Mode and Windows Virtual PC website from here, and then click Get Windows XP Mode and Windows Virtual PC now.
  2. Select your Windows 7 edition and desired language for installation.
  3. Under Download and install Windows XP Mode, under Windows Virtual PC, click Download.
  4. Once downloaded, run the downloaded file.
  5. Click Yes to install Update for Windows (KB958559).
  6. If you accept the license terms, click I Accept.
  7. After installation is complete, click Restart Now to restart your computer.
  • USING XP MODE
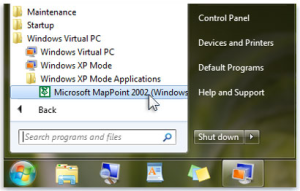
  1. Click Start button, then All Programs. Click Windows Virtual PC, and then click Windows XP Mode.
  2. If you accept the license terms, click I accept the license terms, and then click Next.
  3. On the Installation folder and credentials page, accept the default location where Windows XP Mode files will be stored, or choose a new location.
  4. Type a password, type it again to confirm it, and then click Next.
  5. Click Start Setup. After setup is complete, Windows XP Mode opens in a separate window.
  •  INSTALLING & USING PROGRAMS IN XP MODE
  1. Install any program you would like to use on XP mode.
  2. Once installation completes, click Start button, click Windows Virtual PC. Then Windows XP Mode Applications, and then click the program you want to open.
    winxpmode1

Note:
In XP mode, your physical CD/DVD drives will remain available and perform other operations like you do with normal installation of XP. Also, when a program is installed in XP mode, it will also appear in Windows 7 and you can open them directly from there.

On Windows 8

XP Mode was available for free to Windows 7 Ultimate and Enterprise users which gave them the option of running their programs in a virtual XP environment. It was almost as good as a physical installation (depending on PC configuration of course). Also, it was easy to use and most of the configuration was handled by the setup itself making it ready to use as soon as the installation completes.

For Windows 8, since this feature is officially unavailable a little tweaking has to be done in order to make it work. Steps are mentioned below:

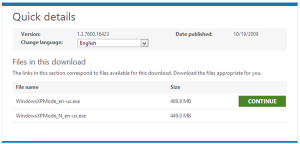
  1. Download WindowsXPMode_en-us.exe from Microsoft's website. Before downloading it will ask you for validation which is necessary to download to check that the copy of Windows you are currently running is genuine.
    winxpmode2
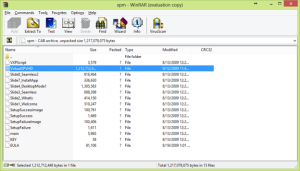
  2. Once the file is downloaded, use any archival tool (Winzip, Winrar etc.) to open the downloaded executable file as an archive.
    winxpmode3
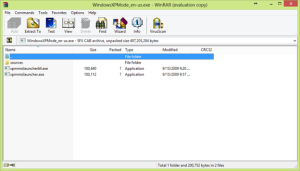
  3. Locate file 'xpm' under 'sources' folder and extract the 'xpm' file to your computer.
    winxpmode4
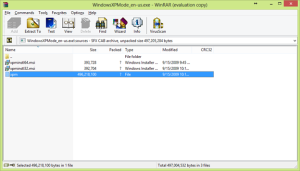
  4. If not automatically opened, select the extracted file 'xpm' and open it with the archive program (Winzip, Winrar etc.) Locate a file named 'VirtualXPVHD' and rename it with .vhd extension. (You may have to extract this file too if not automatically done by the archival software)
    winxpmode5
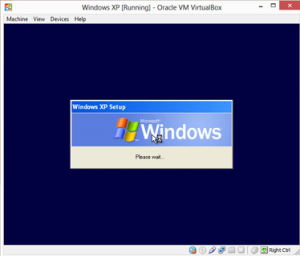
  5. Load this file (VirtualXPVHD.vhd) into any virtual machine emulator software e.g. VirtualBox and enjoy XP virtual environment in Windows 8.
    winxpmode6

Hope this helped. If you feel any section of this blog facilitated you in any way, do not forget to hit the like button.

I would be more than happy to welcome any comments and feedback on the content of this blog. If you think there is any particular topic or section you would like to see  in this blog, drop me an email at sysnetadvisor@gmail.com.

You can also follow my blog by entering your email address on the right and you can receive email notifications for new posts added to the blog.

Stay updated!

Get Thousands of Visitors for Your Website

autosurf

Get Free Dot Tk Domain

Earn Money by Just Shortening URL